
Routes Configuration
Routes let you define a sequence of turnout operations that execute together as a single action. Instead of throwing each turnout individually, you define a route once and activate it with one tap. Routes can be triggered from the Throttle app, the Cloud app, or programmatically through the server.
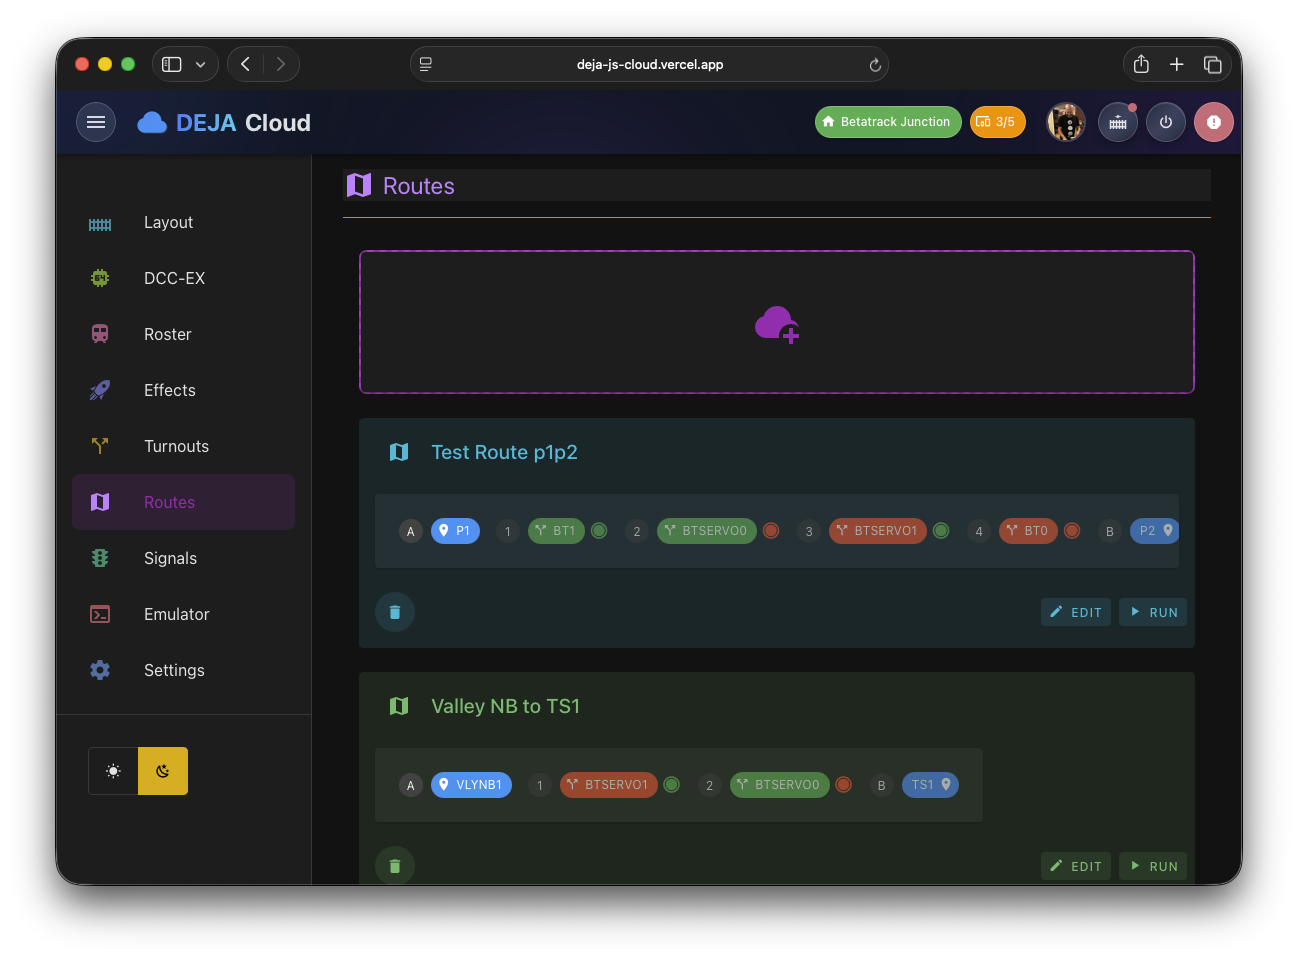
Route List
The main routes view (/routes) displays your defined routes as a list of cards. Each card shows the route name and provides a clickable interface to navigate to the edit form. An "Add" tile at the beginning of the list lets you create new routes.
Creating a Route
Navigate to /routes/new or click the Add tile. The route form has three main areas: metadata, turnout sequence, and display options.
Route Metadata
| Field | Description | Required |
|---|---|---|
| Name | A display name for the route (e.g., "Main Line to Yard") | Yes |
| Point 1 | The starting location or track identifier | Yes |
| Point 2 | The ending location or track identifier | Yes |
The Point 1 and Point 2 fields are free-text identifiers that describe the route's endpoints on your layout. They are also used to auto-generate the route's ID when creating a new route.
Turnout Sequence
The core of a route is its turnout sequence. The Turnouts card displays the currently assigned turnouts as a draggable list of rows, reordered with a drag handle. Each row shows:
- The turnout name
- A Straight / Divergent toggle button setting the turnout's target state for this route
- A live-state color dot -- green when the turnout is currently straight, amber when divergent
- A lightning-bolt Test throw button that fires that turnout on real hardware immediately
- A delete button to remove the turnout from the sequence
Adding Turnouts to a Route
Click the + button on the Turnouts card to open the turnout selector dialog. This shows all turnouts defined in your layout. Select the turnouts you want to include in the route and confirm. Duplicate entries are automatically deduplicated.
Setting Turnout State
Each turnout in the route has a configurable target state. Click its Straight / Divergent toggle button to set whether the turnout should be set to straight or divergent when the route executes.
Removing Turnouts
Click the delete icon on any turnout row to remove it from the route sequence.
Testing a Route
While editing, you can click the Run Route button to immediately execute the route without saving -- every turnout in the sequence throws right away.
This is useful for verifying that a route works correctly before saving it.
Display Options
- Color -- Click the color picker button to choose a display color for the route card in the UI. A color picker dialog lets you select from a full palette.
- Tags -- Assign tags to the route for filtering and organization. Tags are shared across the layout.
Editing a Route
Click any route card in the list to navigate to /routes/:routeId. The edit form is identical to the create form, pre-populated with the route's existing data. The header displays "Edit Route" instead of "Add Route". Modify any fields and click Submit to save, or Close to discard changes.
Deleting a Route
Route deletion is handled from the route's card in the Route List, not the edit form.
How Routes Execute
When a route is activated, its turnouts throw in sequence rather than all at once -- there's a brief delay between each successive throw.
Related Pages
- Turnouts Configuration -- Define the turnouts that routes reference.
- Cloud App Overview -- Return to the main Cloud app guide.
- Effects Management -- Create effects that can be triggered alongside routes.