
Beyond the Throttle
DEJA.js isn't just a throttle — it's a full layout automation platform. IO devices let you control turnouts, signals, lighting, sound, and sensors from the same apps you already use to run trains.
Connect an Arduino over USB for wired reliability, or a Pico W over WiFi for wireless flexibility. Configure everything in the Cloud app, then control it all from the Throttle — no code required.
Video walkthrough coming soon
Make sure you've completed the Getting Started guide — your server should be running and your EX-CommandStation connected.
How It Works
DEJA.js connects your browser to your layout hardware through three communication protocols — each optimized for different setups. This is the same diagram engine used in the Architecture Guidedocs, so it always matches the platform's real topology.
Choose Your Protocol
🔌
Serial USB
Direct & reliable
📡
MQTT over WiFi
Wireless & scalable
🌐
WebSocket
Real-time & flexible
Ready-Made Devices
Arduino
Serial USB · Wired
ESP32
Serial USB or WiFi MQTT
Pico W
MQTT WiFi · Wireless
WLED
Addressable LED strips
Flash any ESP board with WLED firmware, connect it to a strip, and register it as a device in Cloud. Save scenes — brightness, effect, palette, and colors — then activate them from Cloud or the Throttle app's WLED tab.
WLED ScenesdocsBuild Your Own
DEJA.js uses open protocols — any device that speaks Serial, MQTT, or WebSocket can join your layout. Send JSON commands and you're in.
Custom Device GuidedocsSound effects don't need a board at all — upload files to the sound library in Cloud and they play back through your DEJA Server's own speakers, triggered instantly from any Throttle. See Soundsdocs.
Register a Device, Then Wire It Up
Everything below happens in the Cloud app. Register the device once, then assign as many turnouts, effects, and sensors to it as it has pins for.
Add the Device
Open Devicesdocs and click Add. Give it a Device ID (e.g. yard-board-1), then pick its Device Type — deja-arduino or deja-esp32 for USB, or deja-esp32-wifi/deja-mqtt for wireless. Connection (USB or WiFi/MQTT) is auto-filled from the type; for wireless devices, add the WiFi SSID/password and MQTT broker — they get baked into the firmware when you deploy.
Add an Effect
Open Effectsdocs and click Add. Pick the device you just registered, then pick an effect type (Light, LED, Relay, etc.). Set a Name and the output Pin on that device — a color and tags are optional.
Add a Sensor
Open Sensorsdocs and click Add. Set a Name, Index, and input Pin, then pick the same device and its Sensor Type (Digital/Analog) and Input Type (Infrared, reed, etc.). Optionally link it directly to the effect from step 2 — the effect fires automatically whenever the sensor activates.
Add a Turnout
Open Turnoutsdocs and click Add. Set a Name and its DCC Index, then the Straight and Divergent position values (servo angle or pin state). Pick the Type (Kato or Servo) and the same device — the turnout now shows up on that device's details page alongside the effect and sensor.
Everything you just added is what deja deploy reads to generate the device's firmware config — see Device Detailsdocs to view them all in one place, or jump straight to the deploy flow below.
Configure once, deploy to any device
Plug in a new device and it's auto-detected by the server. Configure pins, servos, and outputs in the Cloud app, then deploy with a single command — no re-flashing, no code changes.
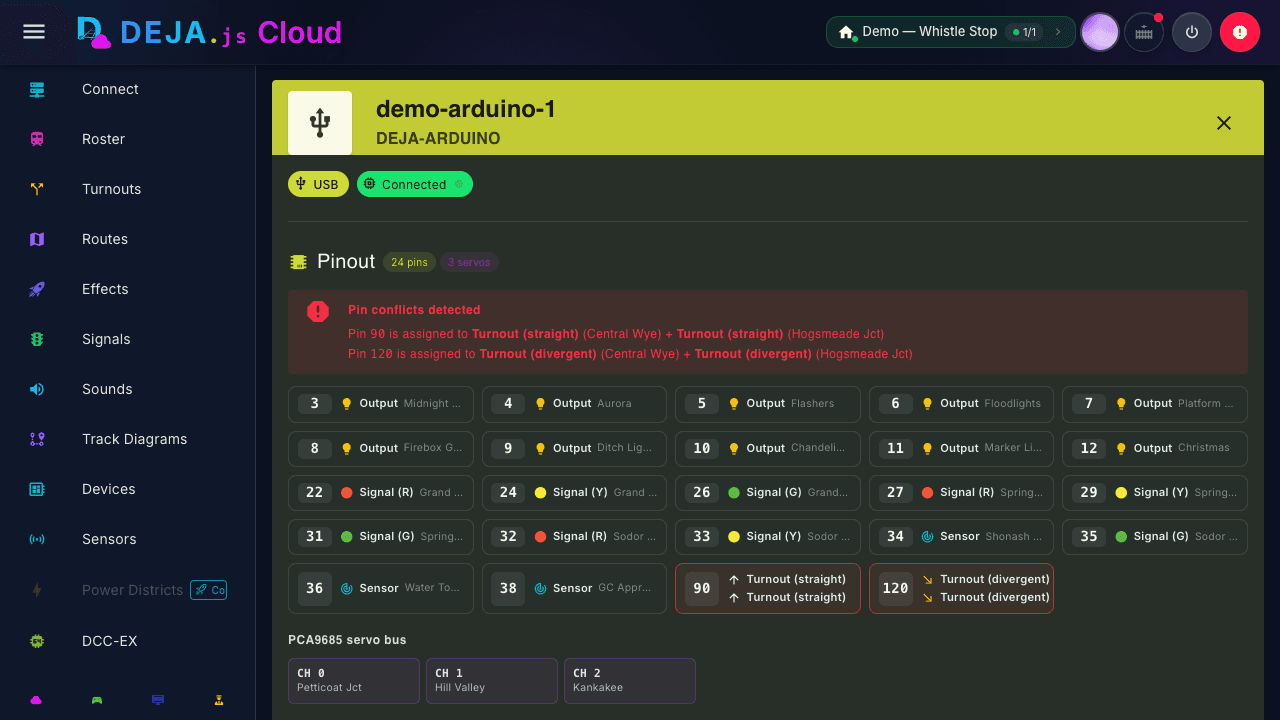
Every registered device gets a details page — pinout, assigned turnouts, effects, signals, and sensors, plus the exact deploy command for that device.
From your terminal, one command reads a device's live configuration from Cloud, generates the right firmware config, and flashes the board:
- Pick the layout from your DEJA Cloud account
- Pick a registered device (auto-filtered to flashable types)
- Enter WiFi/MQTT credentials — only for wireless devices
- Config is generated from that device's turnouts, effects, sensors, and signals
- The board is compiled (or copied, for Pico W) and flashed